How to Reuse your Python Libraries (For Beginners) with UV
July 15, 2025 // Python
Source code: Github

This tutorial offers a lightweight framework for reusing code after transitioning to UV, eliminating the need to publicly share proprietary or sensitive code. Such an approach is essential in professional settings where confidentiality is paramount
Audience: Beginners and non-software developers wishing to reuse personally written code on an "it just works" basis.
Tutorial Objective: Create a package with a function and a script function that can be imported and used elsewhere on your system. The very few functions written will be placed in separate files to mimic a larger code structure. This example does not use workspaces.
Procedure:
- Create a skeleton using UV
We have two skeleton options provided by UV (--package and --lib) and, of course, you can build your own. The terms package and library are often used interchangeably so lets look at what each option provides. I will run both from my linux prompt.
$ uv init --lib my-library
$ uv init --package my-package
Initialized project `my-package` at `\home......`
If you already have a folder created with the name of the package/library you wish to write, `cd` into the folder and run the same command, without the library or package name. For example:
my-library$ uv init --lib
The result of both uv initialization scripts is a similar code structure with subtle differences. By typing tree at the prompt, the following is shown.
$ tree
- .
- my-library
- pyproject.toml
- README.md
- src
- my_library
- __init__.py
- py.typed
- my-package
- pyproject.toml
- README.md
- src
- my-package
- __init__.py
File Structure Differences:
The difference in file structure is the additional `py.typed` file in the my-library tree. This file indicates to static type checkers that type annotations are used and should be checked for type correctness.
Hidden Content:
Though not apparent with `tree` output, a virtual environment is set up for our new package/library and git is initialized. Using `ls -la` shows the following files:
$ cd my-package
my-package$ ls -la
./
../
.git/
.gitignore
pyproject.toml
.python-version
README.md
src/
.venv of the virtual environment is not yet present as it has yet to be called upon. We can invoke its initialization simply by running `uv run`, so let's do that after changing to our project root directory:
my-package$ uv run python --version
Python 3.10.18
Now let's again look at the hidden files:
my-package$ ls -la
In addition to the previous files shown, you should see a .venv folder and an uv.lock file. You can see your git status by running:
my-package$ git status
It is worth noting that you already have a package installed in your local environment; it simply has little functionality at present. Type `uv tree' at the prompt:
my-package$ uv run tree
Resolved 1 package in 0.48ms
my-package v0.1.0
Content Differences:
The `__init__.py` for each differs: one is a return statement, the other a print statement. Both statements below are run from the project root directories (within my-library and my-package respectively).
my-library$ cat src/my-library/__init__.py
def hello() -> str:
return "Hello from my-library!"
my-package$ cat src/my-package/__init__.py
def hello() -> None:
print "Hello from my-library!"
Also, the `pyproject.toml` file differs in one table. The `--package` option includes the [project.scripts] table indicating that a script is located in function `main`. According to the Python Packaging User Guide, the my-package script is equivalent to:
import sys; from my-package import main; sys.exit(main()).
We will use this form of the script further along. Both pyproject.toml files use a hatchling backend, thus the modules must be located in a `src/' folder (don't rename it to `app'). The `pyproject.toml` will look something like this (with the difference between the files is highlighted in red).
my-package$ cat my-package/pyproject.toml
[project]
name = "my-project"
version = "0.1.0"
description = "Add your description here"
readme = "README.md"
authors = [
{name.... email...}
]
requires-python = ">=3.10"
dependencies = []
[project.scripts]
my-package = "my_package:main"
[build-system]
requires = ["hatchling"]
build-backend = "hatchling.build"
In summary, the differences between using --package and --lib with uv init are:
- the presence of a py.typed file in the my-library/src/my_library folder, and
- a scripts table in my-package/pyproject.toml.
If you only want to access the modules without a script, use the --lib option. If you might benefit from running a script, use the --package option. You can always add a script table to your pyproject.toml down the road, or remove it so it matters little. Let's move forward with the latter option (uv init --package) as it gives a very clear entry point (the script).
- Remove the unwanted directory
Remove the unwanted directory by running the following from the parent directory of the two new folders you made by running uv init.
$ rm -rf my-library
- Move into your project package directory:
$ cd my-package
- Change the Python version if you wish.
You could have stipulated which Python version you wanted for your package virtual environment during the init command using:
$ uv init --package --python "python==3.9.21" my-package
However, I did not, so my default package was used instead (3.10.18) which we saw by running `uv run python --version' from within the my-project directory.
Typing the following will show all the installed Python packages available to any uv project I create (without downloading a new Python version):
$ my-package# uv python list
I can install those listed as present on my system without needing to download another Python version to my machine (or select one that isn't listed and it will be downloaded). As I did not specify a Python version in my `init` command, 3.10 was installed in my project's virtual environment and UV established the project with a requirement that Python versions be greater than or equal to 3.10 (according to my pyproject.toml file).
I can upgrade my project python version by changing the version in my .python-version file to a newer Python version as it meets the >= requirement in the pyproject.toml. If not already available on my system, it will be downloaded by UV the next time I run `uv run` within the project directory.
If I wish to downgrade my project's Python version, I need to change BOTH the pyproject.toml Python requirements line, and change the Python version in .python-version. You can open an editor to adjust pyproject.toml and run the following to change the .python-version code:
my-package$ echo "3.9" > .python-version
Two items need changing!
After you have made your changes, and you run a `uv run` command, you will see your version updated/upgraded/downgraded as you chose. If you have added additional libraries already to your project, downgrading or upgrading Python may require a little more effort due to individual package dependencies. Let's check our version of Python after making an upgrade or downgrade change. Note: `uv run` tells UV to read the pyproject.toml file and the .python-version file, so no changes occur to your Python version until you give the `uv run` command, such as this one:
my-package$ uv run python --version
- Test the default set up
But we haven't written any code, how to we test it? Ah, but the `__init__.py file has a function called main(), our pyproject.toml file has a script stipulated (called main), and hatchling recognizes anything in a src directory as part of your code, so:
my-package$ uv run my-package
Hello from my-package!
The --package option provides a print statement, so, we are seeing the main() function side effects.
- Write some code
Let's make a simple example complicated to better mimic a more likely case.
Create two files in the src/my-package/ directory and update the __init__.py file (while maintaining the tabs/indents). I highly recommend downloading them from Github so not to disturb the indentation/Python formatting etc.
src/my_package/frictionfactor.py:
import math
import numpy as np
def calculate_frictionfactor(Re : float, e_over_d : float) -> float:
"""Haaland function as provided by White [1]"""
ff = -1.8*math.log10(6.9/Re + math.pow(e_over_d/3.7, 1.11))
return 1/ff * 1/ff
def calculate_frictionfactorcurve(e_over_d: float) -> list[float]:
x = []
y = []
for Re in np.logspace(4,8):
x.append(Re)
y.append(calculate_frictionfactor(Re, e_over_d))
return [np.array(x),np.array(y)]
This is the explicit Haaland function as provided by White [1].
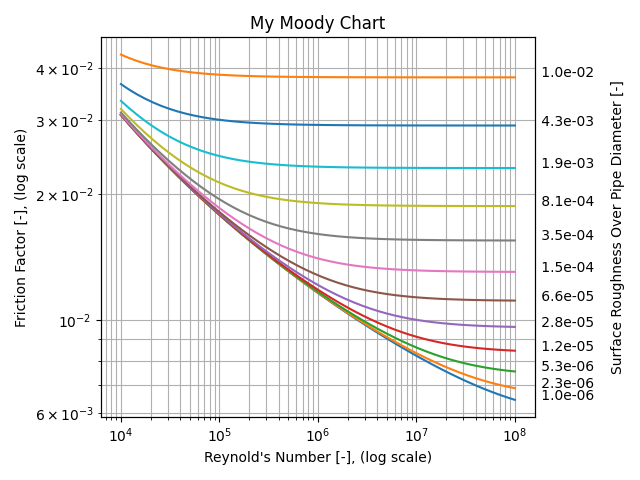
src/my_package/plotmoody.py:
import numpy as np
import matplotlib.pyplot as plt
from .frictionfactor import calculate_frictionfactorcurve
def plot_moodychart(a = -6, b = -2, num = 5) -> None:
fig, ax1 = plt.subplots()
ax2 = ax1.twinx()
for e_over_d in np.logspace(a,b, num=num):
[x,y] = calculate_frictionfactorcurve(e_over_d)
ax1.loglog(x, y)
ax1.text(x[-1], y[-1], f" {e_over_d:.1e}")
ax1.set_xlabel("Reynold's Number [-], (log scale)")
ax1.set_ylabel("Friction Factor [-], (log scale)")
ax2.set_ylabel("Surface Roughness Over Pipe Diameter [-]", labelpad=55)
ax2.set_yticklabels([])
ax2.set_yticks([])
ax1.set_title("My Moody Chart")
plt.tight_layout()
ax1.grid(True, which="both", ls="-")
plt.savefig("MyMoodyChart.png")
Since we have a script already set up in the __init__.py file, let's use it. Update the contents of the __init__.py file:
src/my_package/__init__.py:
import numpy as np
from my_package.plotmoody import plot_moodychart
from my_package.frictionfactor import calculate_frictionfactor
def main() -> None:
print("Hello from my-package, aka. Moody Chart maker!")
range = input("Enter min and max value of Relative Roughness values (separated by a comma)\nto be ploted:\n")
range = range.replace(" ", "")
a,b = range.split(",")
a,b = float(a),float(b)
a = np.log10(a)
b = np.log10(b)
num = input("Enter number of Relative Roughness values you wish to plot (int):\n")
num = int(num)
plot_moodychart(min(a,b), max(a,b), num)
- Run some code
Let's make a Moody Chart. First, we need to add the dependencies. I have included imports from math, numpy and matplotlib. Math is a standard library so we only need to add the latter two to the project.
my-package$ uv add numpy matplotlib
Now inspect your pyproject.toml file. We have an automatically updated dependencies list (see dependencies table in the pyproject.toml file.). To inspect the file from the prompt, type:
my-package$ cat pyproject.toml
Now, run the script (this will run the function main() in __init__.py) and remember you have inputs to enter at the prompt for this script:
my-package$ uv run my-package
Suitable inputs are:
Input 1: 0.000001,0.001
Input 2: 10
There should be a `.png` file in the directory with our Moody Chart.
- Make a useful script and reusable code
Let's make a package with (1) a script that creates the Moody Chart for pipe friction in the local directory and (2) a function to calculate friction factor so we never need to write either again.
First, look at your tree and see what's there before running the build command. After running build, we will have built artifacts in the dist/ directory and of course we have the project built in the current directory.
my-package$ uv build
We now have a new folder in our root package directory called dist/ with both a src file and a python wheel file.
I will change my version number in the pyproject.toml file NOW so if I build again, I will have another wheel and src file with the updated version number and any changes made to the code. This will make it easier to keep track of versions used in other projects.
my-package$ uv version --bump minor
My version number is now 0.2.0 and my previously created distribution packages are labelled:
my_package-0.1.0.tar.gz
my_package-0.1.0-py3-none-any.whl
If I make any changes a month down the road and rebuild the project, I will see an additional version making it obvious to me that I should install the updated version in my other projects relying on these modules.
- Reuse the code elsewhere
Move out of the project directory and create a new uv project using:
my-package$ cd ..; mkdir testproject; cd testproject
testproject$ uv init
testproject$ Initialized project `testproject`
Install the code you packaged into this new directory.
testproject$ uv add ../my-package/dist/my_package-0.1.0-py3-none-any.whl
I highly recommend not using a relative path. Use an absolute one instead, thus enabling the relocation of your new project if necessary. For my personal machine, it would look something like so:
testproject$ uv add ~/Programming/my-libraries/my-package/dist/my_package-0.1.0-py3-none-any.whl
The output states that my-package==0.1.0 is installed.
- Test the script
testproject$ uv run my-package
I entered "0.000001,0.001" (without quotation marks) at the first input request, and "10" at the second (again
without quotations). I now have a MyMoodyChart.png file in my present directory. Dope.
- Test the `calculate_frictionfactor' function
Open main.py in testproject/. Add to the top of the file:
import my_package
Note that python has converted our my-package original directory name to a more suitably structured module name (with
an underscore). Our original project directory was `my-project`. UV created a src/my_project module name but the
project name in pyproject.toml is `my-project`. Thus, we install `my-project`, but we import `my_project`.
Within the main function definition, add the following two lines of code:
print("Calculate Friction Factor of Re = 1E6 and Relative Roughness of 0.15:")
print(my_package.frictionfactor.calculate_frictionfactor(1E6,0.015))
The main.py file in testproject/ should now read:
import my_package
def main():
print("Hello from testproject!")
print("Calculate Friction Factor of Re = 1E6 and Relative Roughness of 0.15:")
print(my_package.frictionfactor.calculate_frictionfactor(1E6,0.015))
Let's run it! We must run it from the root of our new project (testproject) as that is where we just installed the packaged Python code.
testproject$ uv run main.py
Hello from testproject!
Calculate Friction Factor of Re = 1E6 and Relative Roughness of 0.15:
0.04382169574207327
I should probably clean up that print out...
Don't forget to view your testproject/pyproject.toml. It now shows `my-package` as a dependency and the path to its location.
Organization:
This all comes down to personal preference. In my ~/ (Home) directory I have created a Programming/ directory. Within ~/Programming/, I store all my reusable code projects in a folder called `my-libraries`, and the directory of each package is better named, for example: my-libraries/fluiddynamics, my-libraries/flowregime, my-libraries/transientsolvers etc :). I keep my history of tar.gz and whl files in the dist/ folder of each package and never relocate them.
My packages, which import the libraries from my-libraries, are stored in my `client-packages` or `computataionalsupport` directories depending upon whether the project is professional development or client focused.
$ tree
- my-libraries
- fluiddynamics
- pyproject.toml
- README.md
- src
- fluiddynamics
- __init__.py
- module1.py
- module2.py
- thermocalculators
- pyproject.toml
- README.md
- src
- thermocalculators
- __init__.py
- module1.py
- module2.py
- flowregimetransitions
- ...
- client-packages
- clientname001
- clientname002
- clientname003
- computationalsupport
- flowregimegui
- mesher
- collocated-simple
- staggered-simple
We have two skeleton options provided by UV (--package and --lib) and, of course, you can build your own. The terms package and library are often used interchangeably so lets look at what each option provides. I will run both from my linux prompt.
$ uv init --lib my-library$ uv init --package my-package Initialized project `my-package` at `\home......`
If you already have a folder created with the name of the package/library you wish to write, `cd` into the folder and run the same command, without the library or package name. For example:
my-library$ uv init --lib The result of both uv initialization scripts is a similar code structure with subtle differences. By typing tree at the prompt, the following is shown.
$ tree
- .
- my-library
- pyproject.toml
- README.md
- src
- my_library
- __init__.py
- py.typed
- my-package
- pyproject.toml
- README.md
- src
- my-package
- __init__.py
File Structure Differences:
The difference in file structure is the additional `py.typed` file in the my-library tree. This file indicates to static type checkers that type annotations are used and should be checked for type correctness.
Hidden Content:
Though not apparent with `tree` output, a virtual environment is set up for our new package/library and git is initialized. Using `ls -la` shows the following files:
$ cd my-package my-package$ ls -la ./ ../ .git/ .gitignore pyproject.toml .python-version README.mdsrc/ .venv of the virtual environment is not yet present as it has yet to be called upon. We can invoke its initialization simply by running `uv run`, so let's do that after changing to our project root directory:
my-package$ uv run python --versionPython 3.10.18Now let's again look at the hidden files:
my-package$ ls -la In addition to the previous files shown, you should see a .venv folder and an uv.lock file. You can see your git status by running:
my-package$ git status It is worth noting that you already have a package installed in your local environment; it simply has little functionality at present. Type `uv tree' at the prompt:
my-package$ uv run treeResolved 1 package in 0.48msmy-package v0.1.0Content Differences:
The `__init__.py` for each differs: one is a return statement, the other a print statement. Both statements below are run from the project root directories (within my-library and my-package respectively).
my-library$ cat src/my-library/__init__.py def hello() -> str:
return "Hello from my-library!"my-package$ cat src/my-package/__init__.py def hello() -> None:
print "Hello from my-library!"Also, the `pyproject.toml` file differs in one table. The `--package` option includes the [project.scripts] table indicating that a script is located in function `main`. According to the Python Packaging User Guide, the my-package script is equivalent to:
import sys; from my-package import main; sys.exit(main()). We will use this form of the script further along. Both pyproject.toml files use a hatchling backend, thus the modules must be located in a `src/' folder (don't rename it to `app'). The `pyproject.toml` will look something like this (with the difference between the files is highlighted in red).
my-package$ cat my-package/pyproject.toml
[project]
name = "my-project"
version = "0.1.0"
description = "Add your description here"
readme = "README.md"
authors = [
{name.... email...}
]
requires-python = ">=3.10"
dependencies = []
[project.scripts]
my-package = "my_package:main"
[build-system]
requires = ["hatchling"]
build-backend = "hatchling.build"
In summary, the differences between using --package and --lib with uv init are:
- the presence of a py.typed file in the my-library/src/my_library folder, and
- a scripts table in my-package/pyproject.toml.
If you only want to access the modules without a script, use the --lib option. If you might benefit from running a script, use the --package option. You can always add a script table to your pyproject.toml down the road, or remove it so it matters little. Let's move forward with the latter option (uv init --package) as it gives a very clear entry point (the script).
$ rm -rf my-library
$ cd my-package
You could have stipulated which Python version you wanted for your package virtual environment during the init command using:
$ uv init --package --python "python==3.9.21" my-package
However, I did not, so my default package was used instead (3.10.18) which we saw by running `uv run python --version' from within the my-project directory.
Typing the following will show all the installed Python packages available to any uv project I create (without downloading a new Python version):
$ my-package# uv python list
I can install those listed as present on my system without needing to download another Python version to my machine (or select one that isn't listed and it will be downloaded). As I did not specify a Python version in my `init` command, 3.10 was installed in my project's virtual environment and UV established the project with a requirement that Python versions be greater than or equal to 3.10 (according to my pyproject.toml file).
I can upgrade my project python version by changing the version in my .python-version file to a newer Python version as it meets the >= requirement in the pyproject.toml. If not already available on my system, it will be downloaded by UV the next time I run `uv run` within the project directory.
If I wish to downgrade my project's Python version, I need to change BOTH the pyproject.toml Python requirements line, and change the Python version in .python-version. You can open an editor to adjust pyproject.toml and run the following to change the .python-version code:
my-package$ echo "3.9" > .python-versionTwo items need changing!
After you have made your changes, and you run a `uv run` command, you will see your version updated/upgraded/downgraded as you chose. If you have added additional libraries already to your project, downgrading or upgrading Python may require a little more effort due to individual package dependencies. Let's check our version of Python after making an upgrade or downgrade change. Note: `uv run` tells UV to read the pyproject.toml file and the .python-version file, so no changes occur to your Python version until you give the `uv run` command, such as this one:
my-package$ uv run python --version
But we haven't written any code, how to we test it? Ah, but the `__init__.py file has a function called main(), our pyproject.toml file has a script stipulated (called main), and hatchling recognizes anything in a src directory as part of your code, so:
my-package$ uv run my-packageHello from my-package!The --package option provides a print statement, so, we are seeing the main() function side effects.
Let's make a simple example complicated to better mimic a more likely case.
Create two files in the src/my-package/ directory and update the __init__.py file (while maintaining the tabs/indents). I highly recommend downloading them from Github so not to disturb the indentation/Python formatting etc.
src/my_package/frictionfactor.py:
import math
import numpy as np
def calculate_frictionfactor(Re : float, e_over_d : float) -> float:
"""Haaland function as provided by White [1]"""
ff = -1.8*math.log10(6.9/Re + math.pow(e_over_d/3.7, 1.11))
return 1/ff * 1/ff
def calculate_frictionfactorcurve(e_over_d: float) -> list[float]:
x = []
y = []
for Re in np.logspace(4,8):
x.append(Re)
y.append(calculate_frictionfactor(Re, e_over_d))
return [np.array(x),np.array(y)]
src/my_package/plotmoody.py:
import numpy as np
import matplotlib.pyplot as plt
from .frictionfactor import calculate_frictionfactorcurve
def plot_moodychart(a = -6, b = -2, num = 5) -> None:
fig, ax1 = plt.subplots()
ax2 = ax1.twinx()
for e_over_d in np.logspace(a,b, num=num):
[x,y] = calculate_frictionfactorcurve(e_over_d)
ax1.loglog(x, y)
ax1.text(x[-1], y[-1], f" {e_over_d:.1e}")
ax1.set_xlabel("Reynold's Number [-], (log scale)")
ax1.set_ylabel("Friction Factor [-], (log scale)")
ax2.set_ylabel("Surface Roughness Over Pipe Diameter [-]", labelpad=55)
ax2.set_yticklabels([])
ax2.set_yticks([])
ax1.set_title("My Moody Chart")
plt.tight_layout()
ax1.grid(True, which="both", ls="-")
plt.savefig("MyMoodyChart.png")
Since we have a script already set up in the __init__.py file, let's use it. Update the contents of the __init__.py file:
src/my_package/__init__.py:
import numpy as np
from my_package.plotmoody import plot_moodychart
from my_package.frictionfactor import calculate_frictionfactor
def main() -> None:
print("Hello from my-package, aka. Moody Chart maker!")
range = input("Enter min and max value of Relative Roughness values (separated by a comma)\nto be ploted:\n")
range = range.replace(" ", "")
a,b = range.split(",")
a,b = float(a),float(b)
a = np.log10(a)
b = np.log10(b)
num = input("Enter number of Relative Roughness values you wish to plot (int):\n")
num = int(num)
plot_moodychart(min(a,b), max(a,b), num)
Let's make a Moody Chart. First, we need to add the dependencies. I have included imports from math, numpy and matplotlib. Math is a standard library so we only need to add the latter two to the project.
my-package$ uv add numpy matplotlibNow inspect your pyproject.toml file. We have an automatically updated dependencies list (see dependencies table in the pyproject.toml file.). To inspect the file from the prompt, type:
my-package$ cat pyproject.tomlNow, run the script (this will run the function main() in __init__.py) and remember you have inputs to enter at the prompt for this script:
my-package$ uv run my-packageSuitable inputs are:
Input 1: 0.000001,0.001
Input 2: 10
There should be a `.png` file in the directory with our Moody Chart.
Let's make a package with (1) a script that creates the Moody Chart for pipe friction in the local directory and (2) a function to calculate friction factor so we never need to write either again.
First, look at your tree and see what's there before running the build command. After running build, we will have built artifacts in the dist/ directory and of course we have the project built in the current directory.
my-package$ uv buildWe now have a new folder in our root package directory called dist/ with both a src file and a python wheel file.
I will change my version number in the pyproject.toml file NOW so if I build again, I will have another wheel and src file with the updated version number and any changes made to the code. This will make it easier to keep track of versions used in other projects.
my-package$ uv version --bump minorMy version number is now 0.2.0 and my previously created distribution packages are labelled:
my_package-0.1.0.tar.gz
my_package-0.1.0-py3-none-any.whl
If I make any changes a month down the road and rebuild the project, I will see an additional version making it obvious to me that I should install the updated version in my other projects relying on these modules.
Move out of the project directory and create a new uv project using:
my-package$ cd ..; mkdir testproject; cd testprojecttestproject$ uv inittestproject$ Initialized project `testproject`Install the code you packaged into this new directory.
testproject$ uv add ../my-package/dist/my_package-0.1.0-py3-none-any.whlI highly recommend not using a relative path. Use an absolute one instead, thus enabling the relocation of your new project if necessary. For my personal machine, it would look something like so:
testproject$ uv add ~/Programming/my-libraries/my-package/dist/my_package-0.1.0-py3-none-any.whlThe output states that my-package==0.1.0 is installed.
- Test the script
- Test the `calculate_frictionfactor' function
testproject$ uv run my-packageI entered "0.000001,0.001" (without quotation marks) at the first input request, and "10" at the second (again without quotations). I now have a MyMoodyChart.png file in my present directory. Dope.
Open main.py in testproject/. Add to the top of the file:
import my_packageNote that python has converted our my-package original directory name to a more suitably structured module name (with an underscore). Our original project directory was `my-project`. UV created a src/my_project module name but the project name in pyproject.toml is `my-project`. Thus, we install `my-project`, but we import `my_project`.
Within the main function definition, add the following two lines of code:
print("Calculate Friction Factor of Re = 1E6 and Relative Roughness of 0.15:")print(my_package.frictionfactor.calculate_frictionfactor(1E6,0.015))The main.py file in testproject/ should now read:
import my_package
def main():
print("Hello from testproject!")
print("Calculate Friction Factor of Re = 1E6 and Relative Roughness of 0.15:")
print(my_package.frictionfactor.calculate_frictionfactor(1E6,0.015))
Let's run it! We must run it from the root of our new project (testproject) as that is where we just installed the packaged Python code.
testproject$ uv run main.pyHello from testproject!
Calculate Friction Factor of Re = 1E6 and Relative Roughness of 0.15:
0.04382169574207327
I should probably clean up that print out...
Don't forget to view your testproject/pyproject.toml. It now shows `my-package` as a dependency and the path to its location.
Organization:
This all comes down to personal preference. In my ~/ (Home) directory I have created a Programming/ directory. Within ~/Programming/, I store all my reusable code projects in a folder called `my-libraries`, and the directory of each package is better named, for example: my-libraries/fluiddynamics, my-libraries/flowregime, my-libraries/transientsolvers etc :). I keep my history of tar.gz and whl files in the dist/ folder of each package and never relocate them.
My packages, which import the libraries from my-libraries, are stored in my `client-packages` or `computataionalsupport` directories depending upon whether the project is professional development or client focused.
$ tree
- my-libraries
- fluiddynamics
- pyproject.toml
- README.md
- src
- fluiddynamics
- __init__.py
- module1.py
- module2.py
- thermocalculators
- pyproject.toml
- README.md
- src
- thermocalculators
- __init__.py
- module1.py
- module2.py
- flowregimetransitions
- ...
- client-packages
- clientname001
- clientname002
- clientname003
- computationalsupport
- flowregimegui
- mesher
- collocated-simple
- staggered-simple
[1] White, F.M., "Fluid Mechanics": McGraw Hill, 2011.